Thursday, February 16, 2012

Weeknight Dinner: Corn Flake Crusted Chicken with Spinach and Roast Cabbage

Yum. Yum. Yum. Yum. Yum. Yum. Yum. Yum. Yum. Yum...and Yum!

This recipe is a keeper.  Had it last night for dinner and I couldn't wait to post about it!  Honestly, as a meal, this is one of the best things I've cooked in a while (Bana was involuntarily "Mmmm!"ing).

Check it out!


The Concept: A great-tasting, hearty weeknight dinner that's easy, serves 4, and comes in under $20 total.

The Ingredients: 
For the Corn Flake Crusted Chicken (originally from Six Sisters' Stuff):
4-5 cups corn flakes, crushed
1/2 cup flour
Salt
Pepper
1 egg
1/2 cup milk
2-3 chicken breasts, pounded to 1/2 inch thickness
2 tbsp. olive oil

For the Spinach: (Sorry! I forgot to snap a picture...I was hungry! Geez.)
1 bag fresh baby spinach or 1 box frozen spinach, thawed and squeezed dry
1 medium shallot
1 tbsp butter
Salt
Pepper

For the Roast Cabbage (originally from Martha Stewart):
1 tbsp olive oil, plus 2 tbsp
1 large head cabbage, rinsed, outer-layers removed
Salt
Pepper
1 tsp. caraway seeds (See WIdTOT #2)

The Process:
Roasted Cabbage:
  1. Preheat oven to 400 degrees.
  2. Cut the root off the bottom of the cabbage (don't worry about de-coring it, see WIdTOT #1).
  3. Cut the cabbage into 1 inch slices, starting parallel to the root and working forward to the crest.
  4. Brush 1 tbsp olive oil over the bottom of a sheet pan.
  5. Arrange the cabbage slices in the sheet pan.
  6. Brush with remaining olive oil. Season with salt and pepper.
  7. Bake for 40 minutes or until tender and golden.  Don't worry, the outside edges will burn a little bit, but the center will be cooked perfectly. Enjoy!
Corn Flake Crusted Chicken:
  1. Heat the olive oil in a skillet over medium heat.
  2. Set up three cake pans/bowls/plates/etc.  Put cornflakes in one, flour in another, and milk and egg in the third (beaten together).
  3. Dredge the chicken breasts first in flour, then the milk mixture, and finally the corn flakes.
  4. Arrange carefully in the skillet and cook about 5 minutes per side or until outside is golden and crispy.
  5. Remove to a paper towel lined plate and rest 5 minutes. Enjoy!
Spinach:
  1. Cut the shallot lengthwise into rings.
  2. Melt butter in a skillet over medium heat.
  3. Saute shallots in the skillet until wilted, but NOT browned, about 2-3 minutes.
  4. Add the baby spinach and saute until wilted. Enjoy!
Wish-I'd-Thought-Of-Thats (WIdTOTs):
  1. No need to core the cabbage - unlike boiling, roasting the cabbage tenderizes the core and makes it completely edible.  It's actually one of the tastiest parts!
  2. No caraway seeds - the best thing about this meal is that it only needs two seasonings: salt and pepper.  I wasn't a fan of the caraway seeds on the cabbage.  KISS; just use salt and pepper.
  3. The Kicker: this whole meal feeds 4 and comes in under $20 - If You're looking for a low budget meal that tastes like it was catered, this recipe is for You! It's hearty, filling, and if I may be so bold, &@%! tasty.
The Finished Product:
Cheap. Tasty. Easy. Hearty. Filling.  What else could you want in a week night meal?

Enjoy!
-Cade 

Tuesday, February 7, 2012

CadeMade Two-for: Gameday Favs - Fried Pickles with Jalapeno Ranch Dip

What goes with beer, football, and wings?  Fried pickles? Uh, yes!  With jalapeno ranch dip? Nailed it!


Thanks to Ben and Jocelyn for letting me blog about this recipe.


The Concept: Gameday restaurant fare from Your very own kitchen.

The Ingredients:
For the Jalapeno Ranch dip:
Jalapenos
2 packets ranch seasoning
1 cup buttermilk
2 cups sour cream
Cilantro

For the Fried Pickles:
Flour
Cajun Seasoning
Egg
Milk
1 jar crinkle cut pickles
Oil for frying

The Process:

For the Jalapeno Ranch dip:

Starting with one jalapeno: dice, then combine with remaining ingredients and a pinch of cilantro in a blender.  Blend and taste.  Add jalapenos (to increase the spiciness) and cilantro to taste.

For the Fried Pickles:
  1. Heat about 1/2 inch of oil in a large skillet.
  2. Combine flour with cajun seasoning, about 1 tbsp cajun seasoning per 1 cup flour.
  3. Combine milk and eggs, using 1 egg per 1 cup milk.
  4. Dredge a pickle slice in flour, then in the milk mixture, and back into the flour.
  5. Fry in the skillet until golden brown.
  6. Remove to a paper towel lined plate to dry.
Wish I'd Thought Of Thats (WIdTOTS): Not one.

The Finished Product:
Crispy. Spicy. Tasty. The Fried Pickles with Jalapeno Ranch dip were definitely a hit in Our Gameday fare.

Enjoy!
-Cade

CadeMade Two-for: Gameday Favs - Homemade Chicken Wings

With the Super Bowl this past weekend, I wanted to make something that screams football and I can't even tell you the amount of times I've watched a game eating a batch of wings (with my favorite frosty beverage, of course!).

They come in all ranges of flavors and sauces, from spicy and tart to sweet and smoky to wet and dry.

I decided to make two batches: Sweet Southern Barbeque and Spicy Cajun Dry.  Wow, was it a long process...but the results were worth it!

Check it out!


The Concept: Gameday restaurant fare from Your very own kitchen.

The Ingredients:
4 lbs of chicken wings (tips removed, split at the joint)

For the Sweet Southern Barbeque Sauce (tweaked slightly, originally from The Neelys on FoodNetwork.com):
2 cups ketchup
1 cup water
1/2 cup apple cider vinegar
5 tbsp. sugar
5 tbsp. brown sugar
1/2 tbsp. black pepper
1/2 tbsp. garlic powder
1/2 tbsp. ground mustard
1 tbsp. lemon juice
1 tbsp. Worcestershire sauce

For the Spicy Cajun Dry Rub (credit unknown):
1/2 cup orange juice
2 tsp. paprika
5 bay leaves (ground)
3/4 tsp. caraway seeds (ground)
3/4 tsp. cayenne pepper (ground)
3/4 tsp. cumin (ground)
3/4 tsp. coriander (ground)
1/2 tsp. garlic powder
1 1/2 tsp. mustard (ground)
2 tsp. paprika
3/4 tsp. thyme
1/2 tsp. salt
2 tsp. lime juice

The Process (tweaked slightly, but the credit for The Process goes to Alton Brown): Beware! The whole process takes at least 5 hours.

For the Sweet Southern Barbeque Wings:
  1. Combine all ingredients in a bowl; reserve 1/2 of the sauce mixture.
  2. Place two pounds of wings in a 1 gallon resealable plastic bag and cover with the sauce mixture.  Place in the refrigerator at least 2 hours or overnight.
  3. Place the reserved sauce mixture in a sauce pan and bring to boil.  Reduce to low heat and simmer for 1 hour.  Allow to cool.
  4. Remove the wings from the bag and rinse off the marinade.
  5. Place wings in a steamer basket over boiling water and steam for 10 minutes.
  6. Remove the wings and allow to dry on a cooling rack in a sheet pan lined with paper towels. Place the pan in the refrigerator for 1 hour.
  7. Replace paper towels with parchment paper and place the wings on the parchment paper.
  8. Spread sauce over the wings using a pastry brush (or the back side of a spoon).  Be sure to cover all sides of the wings.
  9. Bake at 425 degrees for 40 minutes, turning the wings after 20 minutes.
  10. Remove from oven, serve warm and enjoy!

For the Spicy Cajun Dry Wings:
  1. Mix the orange juice and paprika in a 1 gallon resealable plastic bag.
  2. Place two pounds of chicken wings in the bag. Place in refrigerator for at least 2 hours or overnight.
  3. Remove the wings from the bag and rinse off the marinade.
  4. Place wings in a steamer basket over boiling water and steam for 10 minutes.
  5. Remove the wings and allow to dry on a cooling rack in a sheet pan lined with paper towels. Place the pan in the refrigerator for 1 hour.
  6. Replace paper towels with parchment paper and place the wings on the parchment paper.
  7. Combine all remaining ingredients, until it forms a paste. If the paste is too thick to spread easily, add 2 tbsp. water or spirits (brandy, whiskey, vodka, etc.) as needed.
  8. Spread paste over the wings using a pastry brush (or the back side of a spoon).  Be sure to cover all sides of the wings.
  9. Bake at 425 degrees for 40 minutes, turning the wings after 20 minutes.
  10. Remove from oven, serve warm and enjoy!

Pat Yourself on the back because You just spent 5 hours making wings!

Wish I'd Thought Of Thats (WIdTOTs): I don't want to kill You with text, so I'll only put the top 3 here:
  • The spiciness of the Cajun Dry wings is directly proportional to the amount of cayenne pepper in the rub - I like my wings pretty spicy, but I also like to enjoy my food; so, I stay away from anything that means: "This will feel like you're eating lava."  I'd say the Cajun Dry rub is about what most restaurants would call "Hot."
  • Make more of the barbeque sauce and put it in a jar - The sauce is really tasty! Keep it in Your refrigerator and "wow!" Your friends with homemade barbeque sauce.
  • The Kicker - The whole process takes about 5 hours - 3 hours if you let the wings marinade over night.  For some people, 5 hours is simply not worth the satisfaction of making homemade wings.  Fortunately, I'm not one of those people!
The Finished Product:
Not Hooters or Pluckers, but definitely better than the mega chains like WingStop.  If you can stand the kitchen for 5 hours, these wings are definitely worth it!

Enjoy!
-Cade

Thursday, February 2, 2012

CadeMade Quickie - Skillet Nachos

The Ingredients:
2 tbsp olive oil
1 potato, diced to 1/2 inch cubes
1 small can green chilies
1/2 cup salsa
1 can chili beans in sauce
1/2 cup shredded cheese (Cheddar, Colby, Colby Jack, Pepper Jack, etc.)
Tortilla chips

The Process:
1. Heat the olive oil in a skillet (cast iron is preferred) over medium-high heat.
2. Saute potatoes, stirring occasionally, until crisp-tender.  Add green chilies.
3. Add chili beans and stir until warm and simmering. Add salt and pepper to taste.
4. Remove the mixture from the skillet and wipe clean. (DO NOT RINSE.)
5. Arrange tortilla chips to cover skillet bottom.  Spoon the bean/potato mixture over the chips.  Top with cheese.
6. Return to heat and cook until cheese is melted.
7. Garnish with some fresh lettuce, tomatoes, and cilantro. Enjoy!

The Finished Product:
Quick. Easy. Vegetarian. Tex-Mex. Delicioso.

-Cade

Sunday, January 29, 2012

Red Velvet Cake Batter Dip with Strawberries

Props to my Aunt Janie for finding this recipe for me (originally from Something Swanky). What can I say? She's known me since I was born and somethings just don't change. :-)

Aside About Cade: My family loves desserts. At Thanksgiving and Christmas We devote an entire table to them. Growing up, Mom always made a different dessert each week and our house always smelled delicious. Let's face it, some of Sister and my worst fights were over who got to lick the cake batter bowl. Woe unto Thee that washes the bowl before We get our spatulas out! (And Woe unto anyone else with a spatula aimed at Our bowl!)

Well Sister, AJ went and done it. We don't have to wait for the bowl scraps anymore. Just dip it and eat it!

The Concept: Red velvet cake batter dip. Seems pretty self-explanatory.

The Ingredients: (adapted according to the WIdTOTs below)
8 oz. cream cheese, softened
1/2 c. butter, softened
1/2 tsp. vanilla
2 c. red velvet cake mix
1 c. powdered sugar
2-3 tbsp. milk
Strawberries for dipping

The Process:
1. Cream together the butter and cream cheese until smooth. Add the vanilla.
2. Beat in the red velvet cake mix 1 cup at a time, alternating with 1 tbsp of milk if You're having trouble incorporating the cake mix (I did).
3. Beat in the powdered sugar.
4. Spoon some of the dip on a strawberry and enjoy!

WIdTOTs:
  • Original recipe needs vanilla - The vanilla really helped sweeten and deepen the existing flavors when I added some to dip.
  • Less powdered sugar - The original recipe calls for 2-3 cups, but after the first cup, the only thing the extra sugar did in this recipe was make the dip look slimey. The first cup did give the batter a slightly sweeter taste and really brought the mixture together; so I kept the first cup.
  • The Kicker - The dip is actually better with strawberries than cookies - I made a batch of the sugar cookies suggested, but trust Me: try the dip on a strawberry. It's heavenly!

The Finished Product:
I was disappointed that the dip didn't pair better with cookies. BUT, the dip was amazing with strawberries.

Come on! It's cake batter as a dip!! How could that not be heavenly?

Enjoy!

-Cade

Monday, January 23, 2012

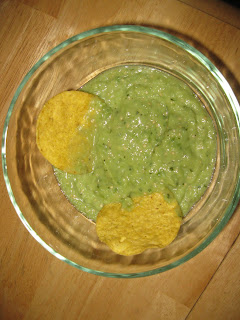
Guacamole Salsa Verde

Got this recipe from a friend off Pinterest (on a side note, I'm waiting for my Pinterest invite, so look me up in a few days and I'll start pinning recipes that I would like to try).

The Guaca-Salsa Verde is originally from another blog called Frosted Bake Shop, but don't let the name fool You. The writer, Erin, really knows her Tex-Mex!

The Concept:
Guacamole and salsa verde on a one dip chip.

The Ingredients:
1 lb. tomatillos
1 jalapeno pepper
1/3 bunch cilantro
1 thick slice of onion
1 garlic clove
1 avocado
1 tsp. salt

The Process:
Cut it. Blend it. Dip it. Quick and easy.

WIdTOTs:
  1. The Kicker - Erin's Guaca-Salsa Verde is VERY good and the technique is simple and straightforward.
  2. Some CadeMade changes that I think would be interesting:
  • Substitute half the tomatillos for diced tomatoes - But only add the tomatoes at the end after You've blended everything else. This will give the salsa a little red color and a nice texture.
  • Substitute all the tomatillos for diced tomatoes - Mรกs conocido como Guaca-salsa Tradicional (That's Spanish for "better known as Traditional Guaca-Salsa.")
  • Add 3 more avocados to get Salsa-Guac - Thicker and creamier. Chill it and serve it.

The Finished Product:
Tangy. Creamy. Delicioso.

Hurry, Your chip is salivating!

-Cade

Sunday, January 22, 2012

Homebrew - Mr. Beer West Coast Pale Ale


After about a month of fermenting, carbonating, and conditioning, I can now officially say I have brewed my own beer. And (if I may be so bold), it was pretty damn good.

A good buddy of mine bought me the Mr. Beer home brew system for Christmas this year. I like beer and I like cooking; good idea right?

I have to say, Mr. Beer pretty much streamlines the home brew process giving you everything you need to brew 256 oz (16 16oz bottles) of the great Friday night pass time. But, there are some WIdTOTs that will help You out on Your first batch.

The Ingredients:

1 Mr. Beer Home Brew Bottling Kit, which includes:
  • 1 Mr. Beer Little Brown Keg - This is the fermenter where Your ingredients will work to make that frosty beverage that will be the big hit of Your next get together.
  • 1 can Hopped Malt Extract (in various flavors; Mine was West Coast Pale Ale) - This is syrupy, good smelling, liquid condensed beer goodness. Smell the can when You get it open! So good!
  • 1 pouch sanitizer - For ridding the fermenter of nasty, bad tasting bacteria lurking in forgotten recesses like the booger guys from the Mucinex commercials.
  • 1 pouch Booster - As far as I can tell this is a combination of different types of sugars that yeast will eat during the fermenting process, which leads Us to Our next ingredient:
  • 1 packet of ale yeast - This is not regular baking yeast. I'm told (by Mr. Beer and those who would know these things) that there are hundreds of strains of yeast out there and some of them are better for doing different things. Baking yeast doesn't give the same taste as ale yeast, etc.
The Process:

The instructions for brewing and sanitizing are in the kit and don't need to be repeated here. But, the process of making beer is actually really interesting. Start with malt, sugar, and water and cook it down for several hours. Then add hops and cook that down to a syrup. Guess what? You now have hopped malt; condense it further and You get Hopped Malt Extract. Then add basically any kind of sugar You want to get any kind of flavor that You want. Once sugar is added, the mixture is called a wort. Get close to it and inhale that sweet beery goodness. The wort is then transferred to a fermenter, where water is added. Yeast goes in last and a vigorous mixing will have beer bubbles pouring out of the top of the fermenter. Now, the lid goes on and the fermenter sits in a cool dark place while the yeast eats the sugars from the wort and poops out alcohol, carbonation, and yeast byproduct (called "trub," pronounced "troob"). After fermentation, the beer is put into bottles with a little more sugar. This step is called priming; it gives the yeast that's still swimming around new sugar to turn into alcohol and carbonation. The bottles are then stored to carbonate and "condition." The last little remnants of yeast will eat the sugars and turn the mixture into what You and I call beer. Chill the bottles in the fridge for a few days and voila, enjoy to Your heart's content.

WIdTOTs: NOTE: These WIdTOTs are for the Mr. Beer brewing process only. I haven't tried to make a wort from scratch yet, but I plan to eventually.
  1. For Your first batch, try to understand the process before You start experimenting with the flavors - Too many people on the Mr. Beer Community forums decided they wanted more alcohol or more hops or fruit or different sugars, etc. On tasting, most of the time, they ended up pouring the stuff down the drain. ALL of them say they would rather have tried it without any changes. If You still want to make changes, remember this: The Mr. Beer Process is tried and perfected. If You follow the steps, You will NOT make bad beer. Can You say the same about Your process?
  2. Cool the wort just slightly before you put it in the fermenter - Mr. Beer says you can just put the hot wort in 4 cups of cold water. This is true, but you want the wort/water to be room temperature when you add the yeast. If it's too cold the yeast go dormant for a while, too hot and the yeast die immediately. Cool the wort for about 5-10 minutes before adding it to the keg.
  3. Stir vigorously once You've added the yeast - When I say stir vigorously, I mean stir until Your arm burns and beer bubbles are roiling. This ensures that the yeast activates and gets to work.
  4. The temperature of the beer during fermentation and conditioning is the single most important part of the whole beer process - Too cold and the yeast go to sleep, too hot and the yeast turn Your precious beer into stinking sewage water. Haha, okay, so that warning was probably too "end-of-the-world" for the actual process. The temperature range of ale yeast varies from 68-76 degrees Fahrenheit. Most people keep their homes cooled/heated to that temp. If You like Your house warmer or colder try to find a spot in Your house that is dark, but slightly warmer or colder depending on what You need.
  5. The Kicker - Patience. What? That's not a step. It's not even a tip or a technique. It SHOULD be! When You freak out becasue You can't tell whether your beer is fermenting, take advice from the Hitchhiker's Guide: DON'T PANIC. If Your beer doesn't smell like the bad things your co-worker leaves in the bathroom at 10Am every morning, remember the Mr. Beer Community unofficial motto: Relax. Don't Worry. Have a Home Brew.

The Finished Product:

Yeasty. Hoppy. Malty. Carbonated. Beer! Don't expect Your first batch to taste like Your local craft brewer. It will however, taste at least as good or better than any of the major domestics.

Keep the WIdTOTs above in mind and You'll enjoy the satisfaction of making and drinking Your very own home brew.

-Cade